Installation manual
Before proceeding, make sure to follow the preparation steps.
Service |
Required |
Description |
|---|---|---|
engine |
✅ |
Control and scheduling for the play-out |
engine-core |
✅ |
Play-out Engine |
engine-api |
✅ |
API for playlogs and track service |
engine-recorder |
Record audio blocks, including archiving |
The required services are needed for minimal functionality.
Prerequisites
ALSA compatible audio interface.
PipeWire version 1.0.0 or higher installed on the host machine.
WirePlumber installed on the host machine
In addition you will need the Pipewire JACK plugin (
pipewire-jack).In production, we recommend to run PipeWire as a system wide daemon with the
aurauser
Setup PipeWire as a system wide daemon
While it is possible to run PipeWire completely inside containers, we recommend a slightly different approach. Instead, create a service to run pipewire and wireplumber in a headless session directly on your host. This provides better performance and still allows you to use your audio devices on the host machine.
make aura-playout.pw.install
This creates the necessary system services, loads the default pipewire configuration to /etc/pipewire/pipewire.conf and creates the socket which pipewire later uses to communicate with aura-playout. After everything is installed you need to reboot your machine for the changes to take effect.
sudo reboot
Check if PipeWire is running
Before proceeding, check if PipeWire is running with systemctl status pipewire.service.
Deploy AURA Playout
To initialize the playout deployment execute:
make aura-playout.init
Optionally, you can provide custom paths for the audio store and logs directory by passing
AURA_AUDIO_STORE and AURA_LOGS as arguments:
make aura-playout.init AURA_AUDIO_STORE=/path/to/audio AURA_LOGS=/path/to/logs
This creates a configuration file config/aura-playout/.env based on the sample.env located in
the same directory. Additionally this command creates the required folder structure and updates
relevant permissions.
Update the configuration file
For a production deployment verify at least the following settings. For testing the playout, the defaults should work in most cases.
Environment variable |
Description |
|---|---|
|
Set hostname or IP, only if AURA Playout is deployed to another host. |
|
You can use this token for authentication against the Engine API. |
|
The secret api token should match the one configured in AURA Web. |
|
The location where Battery is storing audio sources. |
|
The location where M3U playlists are provided. |
|
The location for audio pools, containing at least a |
Verify if AURA Web is running
In order to avoid complicated debugging of the connection between AURA Playout and AURA Web, try
if the URL https://aura.myradio.org/steering/admin is working. It works if you get a login
page served.
Provide some audio files for fallback
Now drop some music files into that folder audio/pool/fallback, respectively the directory you have
set for AURA_AUDIO_STORE_POOL/fallback.
Any audio files located here will be picked up and played whenever nothing else is scheduled.
Connect AURA Playout with your audio interface
To get a list of audio device channel names, use either pw-link -io or, if you prefer more
condensed channel aliases, pw-dump | grep "port.alias.
pw-link -io
  alsa_output.usb-Native_Instruments_Komplete_Audio_6_76C51E0D-00.analog-stereo-out-ab:monitor_FL
  alsa_output.usb-Native_Instruments_Komplete_Audio_6_76C51E0D-00.analog-stereo-out-ab:monitor_FR
  alsa_output.usb-Native_Instruments_Komplete_Audio_6_76C51E0D-00.analog-stereo-out-ab:monitor_AUX0
  alsa_output.usb-Native_Instruments_Komplete_Audio_6_76C51E0D-00.analog-stereo-out-ab:monitor_AUX1
  alsa_output.usb-Native_Instruments_Komplete_Audio_6_76C51E0D-00.analog-stereo-out-ab:monitor_AUX2
  alsa_output.usb-Native_Instruments_Komplete_Audio_6_76C51E0D-00.analog-stereo-out-ab:monitor_AUX3
  alsa_output.usb-Native_Instruments_Komplete_Audio_6_76C51E0D-00.analog-stereo-out-ab:playback_FL
  alsa_output.usb-Native_Instruments_Komplete_Audio_6_76C51E0D-00.analog-stereo-out-ab:playback_FR
  alsa_output.usb-Native_Instruments_Komplete_Audio_6_76C51E0D-00.analog-stereo-out-ab:playback_AUX0
  alsa_output.usb-Native_Instruments_Komplete_Audio_6_76C51E0D-00.analog-stereo-out-ab:playback_AUX1
  alsa_output.usb-Native_Instruments_Komplete_Audio_6_76C51E0D-00.analog-stereo-out-ab:playback_AUX2
  alsa_output.usb-Native_Instruments_Komplete_Audio_6_76C51E0D-00.analog-stereo-out-ab:playback_AUX3
  alsa_input.usb-Native_Instruments_Komplete_Audio_6_76C51E0D-00.analog-stereo-in-ab:capture_FL
  alsa_input.usb-Native_Instruments_Komplete_Audio_6_76C51E0D-00.analog-stereo-in-ab:capture_FR
  alsa_input.usb-Native_Instruments_Komplete_Audio_6_76C51E0D-00.analog-stereo-in-ab:capture_AUX0
  alsa_input.usb-Native_Instruments_Komplete_Audio_6_76C51E0D-00.analog-stereo-in-ab:capture_AUX1
  alsa_input.usb-Native_Instruments_Komplete_Audio_6_76C51E0D-00.analog-stereo-in-ab:capture_AUX2
  alsa_input.usb-Native_Instruments_Komplete_Audio_6_76C51E0D-00.analog-stereo-in-ab:capture_AUX3
  ...
pw-dump | grep "port.alias"
        "port.alias": "Analog Stereo 1/2:playback_FL",
        "port.alias": "Analog Stereo 1/2:monitor_FL",
        "port.alias": "Analog Stereo 1/2:playback_FR",
        "port.alias": "Analog Stereo 1/2:monitor_FR",
        "port.alias": "Analog Stereo 1/2:playback_AUX0",
        "port.alias": "Analog Stereo 1/2:monitor_AUX0",
        "port.alias": "Analog Stereo 1/2:playback_AUX1",
        "port.alias": "Analog Stereo 1/2:monitor_AUX1",
        "port.alias": "Analog Stereo 1/2:playback_AUX2",
        "port.alias": "Analog Stereo 1/2:monitor_AUX2",
        "port.alias": "Analog Stereo 1/2:playback_AUX3",
        "port.alias": "Analog Stereo 1/2:monitor_AUX3",
        "port.alias": "Analog Stereo Input 1/2:capture_FL",
        "port.alias": "Analog Stereo Input 1/2:capture_FR",
        "port.alias": "Analog Stereo Input 1/2:capture_AUX0",
        "port.alias": "Analog Stereo Input 1/2:capture_AUX1",
        "port.alias": "Analog Stereo Input 1/2:capture_AUX2",
        "port.alias": "Analog Stereo Input 1/2:capture_AUX3",
        ...
Next, set the channel name or alias for the input and output channels in your .env file:
# Audio Device Settings
AURA_ENGINE_OUTPUT_DEVICE=default
AURA_ENGINE_OUTPUT_CHANNEL_LEFT=Analog Stereo 1/2:playback_FL
AURA_ENGINE_OUTPUT_CHANNEL_RIGHT=Analog Stereo 1/2:playback_FR
AURA_ENGINE_INPUT_DEVICE=default
AURA_ENGINE_INPUT_CHANNEL_0_LEFT=Analog Stereo Input 1/2:capture_AUX0
AURA_ENGINE_INPUT_CHANNEL_0_RIGHT=Analog Stereo Input 1/2:capture_AUX1
AURA_ENGINE_INPUT_CHANNEL_1_LEFT=
AURA_ENGINE_INPUT_CHANNEL_1_RIGHT=
AURA_ENGINE_INPUT_CHANNEL_2_LEFT=
AURA_ENGINE_INPUT_CHANNEL_2_RIGHT=
AURA_ENGINE_INPUT_CHANNEL_3_LEFT=
AURA_ENGINE_INPUT_CHANNEL_3_RIGHT=
AURA_ENGINE_INPUT_CHANNEL_4_LEFT=
AURA_ENGINE_INPUT_CHANNEL_4_RIGHT=
Leave the input and output device names as default.
You can set up to 5 Input Channels, just leave the ones you dont want to use empty as seen above.
Now that your device ports are set in the .env file, you can start AURA Playout with:
docker compose up -d
During startup, watch the logs for any errors and ensure the successful establishment of channel links:
engine-core  | Linked 'aura_engine_line_out_0:out_0' - 'Analog Stereo 1/2:playback_FL'
engine-core  | Linked 'aura_engine_line_out_0:out_1' - 'Analog Stereo 1/2:playback_FR'
As soon as you see this splash screen, your playout is functional.

After the playout engine successfully boots, the fallback music will play immediately.
Graphical channel routing
If you have difficulty finding the correct channels, or if you want to experiment with different routing options, you can use the graphical tool qpwgraph.
Simply drag and drop connections between your audio device channels and the aura_engine_line_*
virtual devices.
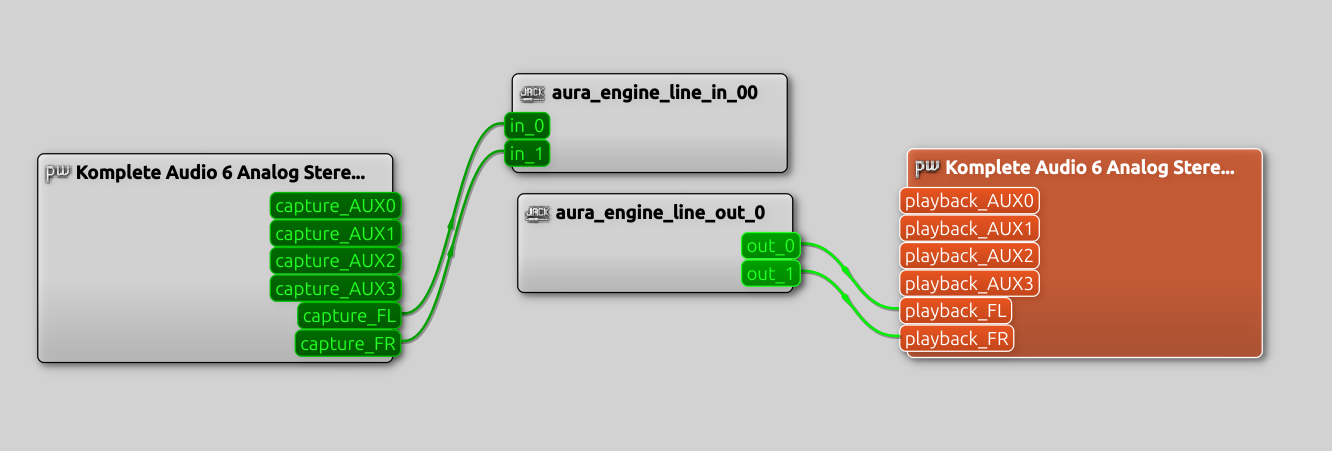
If you prefer a CLI tool, you can use pw-link to manage command-line routing.
Once the correct audio ports are connected, the fallback music will play immediately.
Playout channel routing
Playout channels are routed this way:
        graph TD
    iq0[Queue A] -->|in_queue_0| mix
    iq1[Queue B] -->|in_queue_1| mix
    is0[Stream A] -->|in_stream_0| mix
    is1[Stream B] -->|in_stream_1| mix
    ip0[Playlist A] -->|in_playlist_0| mix
    ip1[Playlist B] -->|in_playlist_1| mix
    il0[Line In 1-5] -->|aura_engine_line_in_0..4| mix
    ff[Fallback] -->silence_detector
    mix["  Mixer  "] --> silence_detector
    silence_detector -->| | output[Output]
    output --> |output.alsa| C[fa:fa-play Audio Interface]
    output --> |output.icecast| D[fa:fa-play Icecast]
Deploy Play-Out bundled with Recorder (optional)
By default the Docker Compose will not deploy the the AURA Recorder. If you want to deploy the AURA Recorder on the same Host start the compose service with
docker compose --profile engine-recorder-enabled up -d
Configure the audio source locations
You need to setup different audio sources in order to perform the playout.
Configure the location for fallback music
By default fallback audio is retrieved from the fallback folder. A local folder for any
emergency playback, also called Station Fallback.
AURA_ENGINE_FALLBACK_PATH=audio/pool/fallback/
All audio files inside are played in a randomized order, in situations where nothing is scheduled. The folder is being watched for changes. So you can add/remove audio on the fly.
This fallback feature is enabled by default, but can be turned off in via the configuration.
Instead of the fallback folder you can use a playlist in the m3u folder for fallback scenarios.
Its default file name is station-fallback-playlist.m3u and located in:
audio_playlist_folder="audio/m3u"
Also this playlist is being watched for changes. You’ll need to set the configuration option
AURA_ENGINE_FALLBACK_PATH=/var/audio/m3u/station-fallback-playlist.m3u to enable this instead of
the fallback folder.
Configure the audio upload folder
This is the location for actually scheduled audio files. They are provided by Battery.
audio_upload_folder="audio/upload"
Configure Icecast Stream Output
Multiple Icecast endpoints can be configured. Aura Playout will then stream its output to those endpoints. To configure these streams, modify the config/services/engine-core.yaml file, which is created during make aura-playout.init. There you can define a list of output streams as follows:
stream:
  - enabled: false
    encoding: "ogg"
    bitrate: "128"
    channels: "2"
    host: "your-stream.aura.radio"
    port: 8000
    mountpoint: "aura-radio.ogg"
    user: "source"
    password: "hackme"
    url: "https://aura.radio"
    name: "AURA Radio"
    genre: "music"
    description: "Music from the community radio software suite"
Make sure to set enabled: true for the streams you want to use.
Features and how they work
Scheduler
Engine provide a scheduling functionality by polling external API endpoints frequently. Those API endpoints are provided by Steering to retrieve schedule information and Battery to retrieve media file information. To define your schedule you’ll also need AURA Dashboard which is an elegent web user interface to manage your shows, playlists and schedules.
Ideally any audio is scheduled some time before the actual, planned playout to avoid timing issues with buffering and preloading. Nonetheless, playlists can also be scheduled after a given calendar timeslot has started already. In such case the playout starts as soon it is preloaded.
If for some reason the playout is corrupted, stopped or too silent to make any sense, then this triggers a fallback using the silence detector (see chapter below).
Note: If you delete any existing timeslot in Dashboard/Steering this is only reflected in Engine until the start of the scheduling window. The scheduling window is defined by the start of the timeslot minus a configured offset in seconds (compare your Engine configuration).
Versatile playlists
It is possible to schedules playlists with music or pre-recorded shows stored on the file system, via external streams or live from an line input in the studio. All types of sources can be mixed in a single playlist.
The switching between types of audio source is handled automatically, with configured fadings applied.
Note: Any live sources or streams not specifying a length property, are automatically expanded to the left duration of the timeslot.
Default playlists
While a timeslot can have a specific playlist assigned, it is also possible to define default playlists for schedules and shows:
Default Schedule Playlist: This playlist is defined on the level of some recurrence rules (Schedule). In case the timeslot doesn’t have any specific playlist assigned, this playlist is broadcasted.
Default Show Playlist: This playlist can be assigned to some show. If neither the specific timeslot playlist nor the default schedule playlist is specified the default show playlist is broadcasted.
If none of these playlists have been specified the Auto DJ feature of Engine Core takes over (optional).
Heartbeat Monitoring
Instead of checking all status properties, the Heartbeat only validates the vital ones required to
run the engine. If all of those are valid, a network socket request is sent to a defined server.
This heartbeat is sent continuously based on the configured heartbeat_frequency. The service
receiving this heartbeat ticks can decide what to do with that information. One scenario could be
switching to another Engine instance or any other custom failover scenario.
Under engine/contrib/heartbeat-monitor you’ll find some sample application digesting these
heartbeat signals.